
This classic pavlova recipe hails straight from Australia (thanks to the mom of a friend of a friend!); it’s a simple meringue dessert that has very minimal prep time and can easily be made in advance. Pile on a heap of slightly sweetened fresh whipped cream, top it with your favorite fresh fruit, and you have the perfect light and airy summer dessert.
If you’ve ever felt intimidated when looking at a beautiful pavlova, fear not! We’re tackling this gorgeous dessert together this month.
Welcome to the July BEB Bake-Along! I am so thrilled to bake with you again this month!
We’re heading into the meat of summer right now and maybe you love those scorching hot days, or maybe you hide in the air conditioning (hello, me), but I bet you’re still making desserts from time to time, right?
But! The days are hot and you just can’t take a decadent chocolate cake right now, and everyone is making those no-bake layered pudding desserts, so where do you turn?
In a word: Pavlova.

Wondering What in the World is Pavlova?
Let’s discuss it.
The dessert was supposedly created to honor a Russian dancer, Anna Pavlova, while she was touring in Australia and New Zealand during the 1920s. The actual place of origin has been a source of contention between the two countries for years, with each laying claim to the creation.
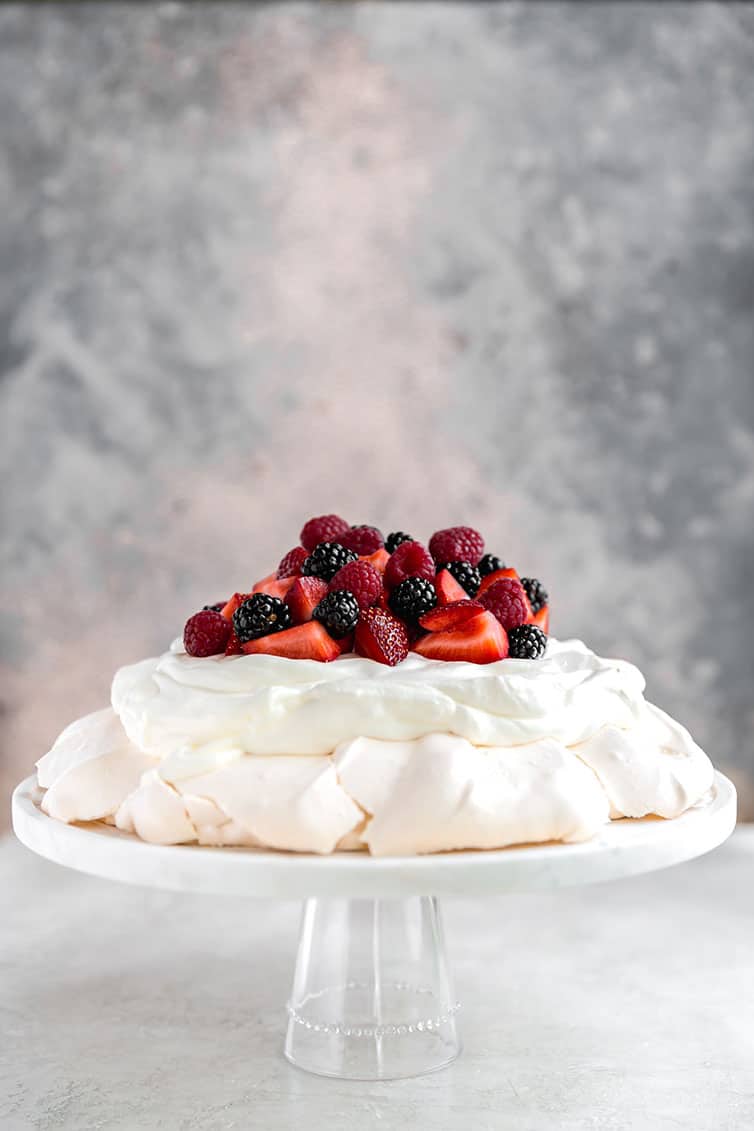
Pavlova is a big pile of meringue that is spread in a circle and baked; once cooled, it is topped with whipped cream and fresh fruit. The outside is crisp, while the inside is soft and pillowy, with the taste and consistency of a homemade marshmallow.


Let’s Make a Classic Pavlova!
The process is super simple, but there are a couple of key tips to ensure you get the best pavlova possible right out of the gate. Here we go!
- Make the Meringue – You’ll start by whipping egg whites until they get frothy, then add a pinch of cream of tartar (this helps to stabilize the egg whites). Once you get to soft peaks, you’ll start to gradually add the sugar, beating until it’s all incorporated and the meringue reaches glossy, stiff peaks. (Is there anything more gorgeous?!)
- Shape and Bake – Spread the meringue into a 9-inch circle on a parchment-lined baking sheet. You can spread it evenly, do decorative edges, whatever you’d like! The pavlova will bake for about 1 hour, or until lightly browned and very firm to the touch. A low and slow cool down creates the best texture, so prop open the oven door (use a wooden spoon if needed!) and let it cool completely in there (I usually leave it overnight).
- Top and Serve – Make a batch of fresh whipped cream, slather it on top of the pavlova, and then top with your favorite seasonal fresh fruit. I love mixed berries, and kiwi is always a great option, too.


Tips for Success
Some reminders when making the classic pavlova recipe:
- You can make individual pavlovas by piping or spreading small circles of meringue on the parchment instead of one large circle.
- The pavlova layer can be made up to 4 days in advance and kept in an airtight container once completely cool. However, once it has been topped with whipped cream, it needs to be served within a few hours, as the meringue will start to soften.
- Use whatever type of fruit you like best to garnish the pavlova; my favorites are mixed berries and kiwi. Other topping options are a raspberry sauce, lemon curd (use up those leftover egg yolks!), or wine-poached pairs, to name a few! Use your favorites or whatever is in season. As you can see, I also love shaved chocolate, as well!

As the pavlova dries it will crack and dip and do all sorts of crazy things – I love its character! It slices clean and pretty and has an incredibly light texture.
When the summer weather has you craving something delicious but light, pavlova is a go-to dessert. It surprises people, leaves them intrigued, and then they will undoubtedly ask for the recipe!

JOIN THE BEB BAKE-ALONG!
To tackle pavlova and bake along with me this month, simply do the following:
- Make the pavlova!
- Snap a picture and either share it on social media (#BEBbakealong on Instagram or Twitter), upload it to the BEB Facebook group, or email it to me.
- Check in on Instagram and Facebook throughout the month to see everyone’s pavlova!
More Light Desserts for Summer
- Pavlova Layer Cake with Whipped Cream and Berries
- Chocolate Pavlova with Mascarpone and Raspberries
- Easy Tiramisu Trifle
- Dark Chocolate Mousse
- Red, White & Blue Berry Trifle

Watch How to Make Classic Pavlova
Classic Pavlova Recipe

A classic recipe for a meringue dessert
For the Pavlova
- 6 egg whites (at room temperature)
- Pinch cream of tartar
- 1½ cups granulated sugar
For the Whipped Cream
- 2 cups heavy cream
- 2 tablespoons powdered sugar
- 1 teaspoon vanilla extract
To Garnish
- Fresh fruit
-
Make the Pavlova: Preheat the oven to 250 degrees F. Line a baking sheet with parchment paper and draw a 9-inch circle in the middle (I traced 8-inch parchment rounds, but you could cake pans or anything else about the same diameter). Spray lightly with non-stick cooking spray.
-
Using an electric mixer with the whisk attachment, beat the egg whites on medium speed until frothy, then add the cream of tartar. Increase the mixer speed to medium-high and beat to soft peaks. While continuing to beat the egg whites, gradually add the granulated sugar (I estimate that I added about 3 tablespoons at a time) and beat until glossy and stiff peaks form. Spoon the mixture onto the circle, and use a spatula to shape the egg white mixture into a circle with decorative sides, if desired.
-
Bake for 1 hour, or until firm to the touch.Turn off the oven and prop the oven door open with a wooden spoon. Allow the pavlova to cool completely in the oven.
-
Make the Whipped Cream: Place the heavy cream, sugar, and vanilla extract in a large bowl and beat on medium-high speed until it holds stiff peaks.
-
Transfer the pavlova to a serving platter, then top with the whipped cream and fresh fruit. Serve immediately or refrigerate for up to 4 hours.
- Use whatever type of fruit you like best to garnish the pavlova; my favorites are mixed berries and kiwi. Other topping options are a raspberry sauce, lemon curd (use up those leftover egg yolks!), or wine-poached pairs, to name a few! Use your favorites or whatever is in season.
- You can make individual pavlovas by piping small circles or meringue on the parchment instead of one large circle.
- The pavlova layer can be made up to 4 days in advance and kept in an airtight container once completely cool. However, once it has been topped with whipped cream, it needs to be served within a few hours, as the meringue will start to soften.
The post July Bake-Along: Classic Pavlova Recipe appeared first on Brown Eyed Baker.


Social Plugin